


Gaussian 16W Reference
The Job Edit Window
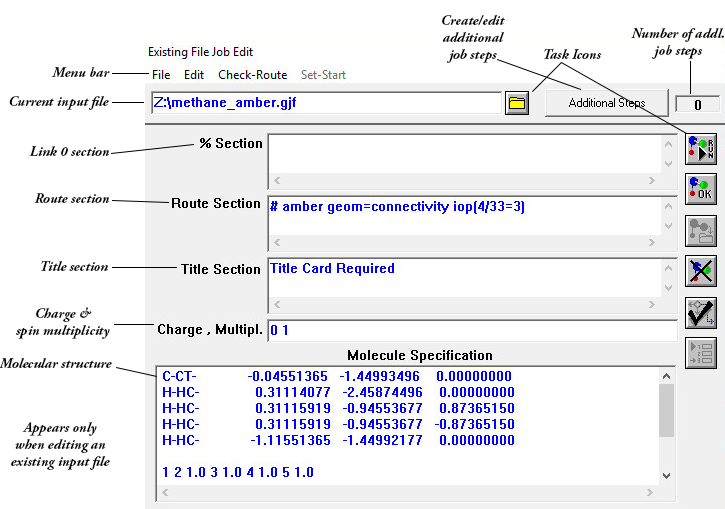
This window is used to create and edit Gaussian 16 input files. It has two titles: Job Entry, when used to create new input, and Existing File Job Edit, when used to modify an existing input file. Note that new input and changes to existing input files are stored in memory as they are made—and thus will be used when job execution begins—but they must be explicitly saved to disk.
The File Menu
The File menu allows you to load and save Gaussian 16 input files. Some of its options have equivalent icons (described later in this section).
Load
Load an existing input file (extension .GJF), replacing any current input. If the filename field is filled in, this file will be loaded. If it is blank, then you will be prompted for the file to load. The loaded file replaces any current input (after prompting for needed saves).
If you select the Load option without changing the contents of the filename field, then the current input will revert to the last-saved form on disk (provided that you answer No to the save prompt).
Save Job
Save the current input to its original file (you will be prompted for a filename if it is newly created input).
Save Job As…
Save the current input to a file that you specify.
External Editor
Invoke the external editor on the current input. The external editor is specified via the preferences.
Abandon Data
Exit from this window, discarding all input and changes.
Exit
Return to the Job Processing window. Current input is retained but is not automatically saved.
Exit & Run
Return to the Job Processing window and begin executing the current input (not automatically saved to disk).
The Edit Menu
The Edit menu includes the standard Windows Edit menu options Undo, Cut, Copy, Paste, and Delete. It also has this additional option:
Clear Form
Erase all information in all sections of the window. No warning is given about any unsaved changes. You can create a new input file from this form by selecting Clear Form, entering the desired input, and then saving it.
The Check-Route Option
This item runs the Check Route utility on the current input (described later in this document). There is an equivalent icon for this option (described later).
The Set-Start Option
This option enables you to set the starting job step for this input file (additional job steps are discussed later in this section). The default is the main (first) step:
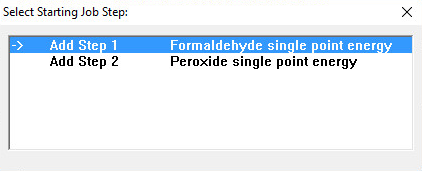
Select the starting step by double clicking on the desired step. Exit from the window by choosing Close from the window’s System menu (reached via the close bar in its upper left corner). There is an equivalent icon for this option (described later).
Icons
The following icons are available in the Job Edit window (the equivalent menu item is in parentheses):
 Return to main menu and begin executing job (File →Exit & Run).
 Return to the main menu (File → Exit ).
 Save all current input to disk (File →Save Job).
 Discard all input and return to main menu (File →Abandon Data).
 Run the Check Route utility (Check-Route).
 Specify the starting job step (Set-Start).
 Load an input file, always asking for the filename, replacing any current input (after prompting for any needed saves). Only present when editing an existing file (File → Load).
The Additional Steps Button
This button takes you to the Additional Job Steps window, described in the next section. The display field to its right indicates the number of additional job steps within this job.
The Additional Job Steps Window
The Additional Job Steps window is used to create and edit multicomponent Gaussian 16 jobs. Note that no file saving takes place from this window; saves must be made from the Job Edit window.
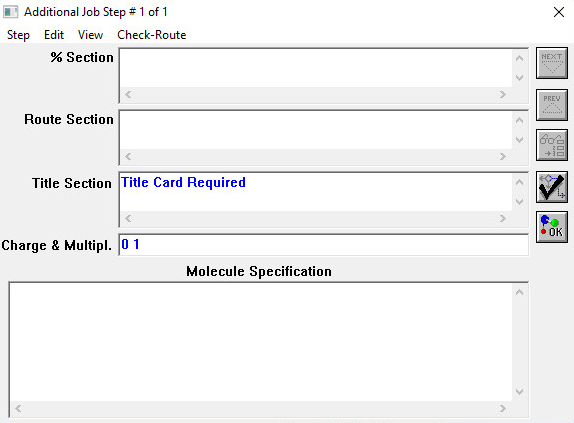
Initial Window Appearance
When you press the Additional Steps button for an input file with only a single job step, the Additional Job Steps window consists solely of its menu bar:

The various input areas are not visible until you create a new step by selecting Add Step from the Stepmenu.
The Step Menu
The Step menu is used to create, remove, and rearrange the order of job steps.
Add Step
Create a new job step after the current one. The contents of the % Section, Title Section, and Charge & Multipl. areas from the main job are automatically copied to the new step. They may be edited as desired as the additional areas are filled in.
Delete Step
Remove the current step from the job.
Reorder
Change the order of the job steps using the Re-Ordering Data window (described in a separate section later in this document).
Load From File
Replace the current step with the job stored in an external file (you will be prompted for the filename). If the file contains more than one job step itself and the current step is the last job step, then all steps from the file will be loaded in their current order.
If the file contains multiple job steps and the current step is not the last step in the job, then only the first step from the file will be loaded, as the current step, and an error message will be displayed.
Exit
Return to the Job Edit window. There is an equivalent icon for this menu item (described later in this section).
The Edit Menu
The Edit menu contains the standard items: Undo, Cut, Copy, Paste, and Delete.
The View Menu
The View menu allows you to move among the additional jobs steps within the current job. Its items also have equivalent icons (described later in this section).
Next Step
Move to the next step (higher numbered) in the job.
Prev Step
Move to the previous step in this job.
Choose Step
Move to the job step number that you specify.
The Check-Route Item
This item runs the Check Route facility on the current input step (described in a separate section later in this document).
Icons
The following icons appear in the Additional Job Steps window (the equivalent menu item is in parentheses):
 Move to the next job step (View: Next Step).
 Move to the previous job step (View: Prev Step).
 Move to a specified step number (View: Choose Step).Run the Check Route utility (Check-Route).Return to the Job Edit window (Step: Exit).
The Check Route Facility
The Check Route facility verifies the route section of the current input (or additional job step if run from the Additional Job Steps window). It displays a window containing the route section, the corresponding link map, and any error messages. This features corresponds to the testrt utility provided with other Gaussian versions.
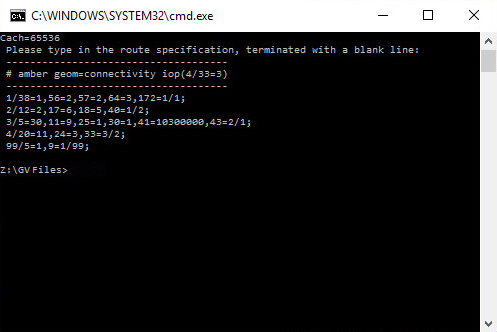
The absence of any error message indicates a valid route section (although Check Route cannot determine whether it is the one you intend or not). You may exit from this window by pressing the Done button when you have finished examining the Check Route output. Consult the Gaussian 16 User’s Reference for more information on this facility.
Last updated on: 31 August 2016.